 russ
russ事件循环机制
一、浏览器中的 JavaScript 事件循环机制
从一道面试题来学习浏览器中的 JavaScript 事件循环机制, 题目如下:👇 👇 👇
async function async1() {
  console.log('async1 start');
  await async2();
  console.log('async1 end');
}
async function async2() {
  console.log('async2');
}

console.log('script start');

setTimeout(function () {
  console.log('setTimeout');
}, 0);

async1();

new Promise(function (resolve) {
  console.log('promise1');
  resolve();
}).then(function () {
  console.log('promise2');
});
console.log('script end');这道题主要考察的是事件循环中函数执行顺序的问题,其中包括 async ,await,setTimeout,Promise函数。
温馨提示
先看看解题需要哪些知识储备,一步一步来解决它。
任务队列
首先我们需要明白以下几件事情:
- JS 分为同步任务和异步任务
- 同步任务都在主线程上执行,形成一个执行栈
- 主线程之外,事件触发线程管理着一个任务队列,只要异步任务有了运行结果,就在任务队列之中放置一个事件。
- 一旦执行栈中的所有同步任务执行完毕(此时 JS 引擎空闲),系统就会读取任务队列,将可运行的异步任务添加到可执行栈中,开始执行。
宏任务
(macro)task(又称之为宏任务),可以理解是每次执行栈执行的代码就是一个宏任务(包括每次从事件队列中获取一个事件回调并放到执行栈中执行)。
浏览器为了能够使得 JS 内部 (macro)task 与 DOM 任务能够有序的执行,会在一个(macro)task 执行结束后,在下一个(macro)task 执行开始前,对页面进行重新渲染,流程如下:
(macro)task-> 渲染 ->(macro)task->...
按照规定,能发起宏观任务的方法有:
- script(整体代码)、
setTimeout、setInterval、I/O、UI 交互事件、postMessage、MessageChannel、setImmediate(Node.js 环境);
微任务
microtask(又称为微任务),可以理解是 在当前 task 执行结束后立即执行的任务。也就是说,在当前 task 任务后,下一个 task 之前,在渲染之前。
所以它的响应速度相比setTimeout( setTimeout 是 task )会更快,因为无需等渲染。也就是说,在某一个 macrotask 执行完后,就会将在它执行期间产生的所有 microtask 都执行完毕(在渲染前)。
microtask 主要包含: Promise.then、MutaionObserver、process.nextTick(Node.js 环境)。async/await实际上是 promise+generator 的语法糖,也就是promise,也就是微观任务。
运行机制
在事件循环中,每进行一次循环操作称为 tick,每一次 tick 的任务处理模型是比较复杂的,但关键步骤如下:
- 执行一个宏任务(栈中没有就从事件队列中获取)
- 执行过程中如果遇到微任务,就将它添加到微任务的任务队列中。
- 宏任务执行完毕后,立即执行当前微任务队列中的所有微任务。(注意!!执行顺序也是按照产生顺序来的)
- 当前宏任务完全执行后,开始检查渲染,然后 GUI 线程接管渲染。
- 渲染完毕后,JS 线程继续接管,开始下一个宏任务(从事件队列中获取)
流程图大致如下:
Promise 和 async 中的立即执行
我们知道 Promise 中的异步体现在 then 和 catch 中,所以写在 Promise 中的代码是被当做同步任务立即执行的。而在async/await 中,在出现 await 出现之前,其中的代码也是立即执行的。那么出现了 await 时候发生了什么呢?
await 做了什么
从字面意思上看 await 就是等待, await 等待的是一个表达式,这个表达式的返回值可以是一个 promise 对象也可以是其他值。
很多人以为 await 会一直等待之后的表达式执行完之后才会继续执行后面的代码,实际上 await 是一个让出线程的标志。await 后面的表达式会先执行一遍,将 await 后面的代码加入到 microtask 中,然后就会跳出整个 async 函数来执行后面的代码。 由于因为async await 本身就是 promise+generator 的语法糖。所以 await 后面的代码是 microtask。所以对于本题中的
async function async1() {
  console.log('async1 start');
  await async2();
  console.log('async1 end');
}等价于如下:
async function async1() {
  console.log('async1 start');
  Promise.resolve(async2()).then(() => {
    console.log('async1 end');
  });
}解题过程
1、首先,事件循环从宏任务(macrotask)队列开始,这个时候,宏任务队列中,只有一个
script(整体代码)任务;当遇到任务源(task source)时,则会先分发任务到对应的任务队列中去。所以,上面例子的第一步执行如下图所示:2、然后我们看到首先定义了两个 async 函数,接着往下看,然后遇到了 console 语句,直接输出 script start。输出之后,script 任务继续往下执行,遇到 setTimeout,其作为一个宏任务源,则会先将其任务分发到对应的队列中:
3、
script任务继续往下执行,执行了async1()函数,前面讲过 async 函数中在await之前的代码是立即执行的,所以会立即输出 async1 start。
遇到了 await 时,会将 await 后面的表达式执行一遍,所以就紧接着输出 async2,然后将 await 后面的代码也就是 console.log('async1 end') 加入到 microtask 中的 Promise 队列中,接着跳出 async1 函数来执行后面的代码。
4、
script任务继续往下执行,遇到Promise实例。由于Promise中的函数是立即执行的,而后续的.then则会被分发到microtask的Promise队列中去。所以会先输出 promise1,然后执行resolve,将promise2分配到对应队列。5、
script任务继续往下执行,最后只有一句输出了script end,至此,全局任务就执行完毕了。6、根据上述,每次执行完一个宏任务之后,会去检查是否存在
Microtasks;如果有,则执行Microtasks直至清空Microtask Queue。因而在script任务执行完毕之后,开始查找清空微任务队列。此时,微任务中,Promise队列有的两个任务async1 end和promise2,因此按先后顺序输出async1 end,promise2。当所有的Microtasks执行完毕之后,表示第一轮的循环就结束了。7、第二轮循环依旧从宏任务队列开始。此时宏任务中只有一个
setTimeout,取出直接输出即可,至此整个流程结束。
最终结果
程序结果
script start async1 start async2 promise1 script end async1 end promise2 setTimeout
相似题一
- 将
async2中的函数也变成了Promise函数,代码如下:
async function async1() {
  console.log('async1 start');
  await async2();
  console.log('async1 end');
}
async function async2() {
  //async2做出如下更改:
  new Promise(function (resolve) {
    console.log('promise1');
    resolve();
  }).then(function () {
    console.log('promise2');
  });
}
console.log('script start');

setTimeout(function () {
  console.log('setTimeout');
}, 0);
async1();

new Promise(function (resolve) {
  console.log('promise3');
  resolve();
}).then(function () {
  console.log('promise4');
});

console.log('script end');程序结果
script start async1 start promise1 promise3 script end promise2 async1 end promise4 setTimeout
相似题二
- 将
async1中await后面的代码和async2的代码都改为异步的,代码如下:
async function async1() {
  console.log('async1 start');
  await async2();
  //更改如下:
  setTimeout(function () {
    console.log('setTimeout1');
  }, 0);
}
async function async2() {
  //更改如下:
  setTimeout(function () {
    console.log('setTimeout2');
  }, 0);
}
console.log('script start');

setTimeout(function () {
  console.log('setTimeout3');
}, 0);
async1();

new Promise(function (resolve) {
  console.log('promise1');
  resolve();
}).then(function () {
  console.log('promise2');
});
console.log('script end');程序结果
script start async1 start promise1 script end promise2 setTimeout3 setTimeout2 setTimeout1
二、node 中的 JavaScript 事件循环机制
Node 的微任务和宏任务
我们会发现从一次事件循环的 Tick 来说,Node 的事件循环更复杂,它也分为微任务和宏任务:
- 宏任务(macrotask):setTimeout、setInterval、IO 事件、setImmediate、close 事件;
- 微任务(microtask):Promise 的 then 回调、process.nextTick、queueMicrotask.
但是,Node 中的事件循环与浏览器有一些差别:
- 微任务队列: next tick queue:process.nextTick other queue:Promise 的 then 回调、queueMicrotask
- 宏任务队列: timer queue:setTimeout、setInterval poll queue:IO 事件 check queue:setImmediate close queue:close 事件
Node 中的事件循环优先级
main script -> nextTicks -> other microtask -> times -> immediate -> 下一个宏任务。
来个例题分析一下
async function async1() {
  console.log('async1 start');
  await async2();
  console.log('async1 end');
}
setImmediate(() => console.log('setImmediate'));

async function async2() {
  console.log('async2');
}

console.log('script start');

setTimeout(function () {
  console.log('setTimeout0');
}, 0);

process.nextTick(() => console.log('nextTick1'));

async1();

process.nextTick(() => console.log('nextTick2'));

new Promise(function (resolve) {
  console.log('promise1');
  resolve();
  console.log('promise2');
}).then(function () {
  console.log('promise3');
});

console.log('script end');按照上面理论分析结果如下图
注意一点 promise 里面执行 resolve() 后 即执行 then() 把回调函数加入微任务队列里面。
注意两点 await 后面相当于 new promise 一样,直接执行。后面的代码才会加入微任务队列。
然后依次执行结果如下:
程序结果
script start async1 start async2 promise1 promise2 script end nextTick1 nextTick2 async1 end promise3 setTimeout0 setImmediate
setTimeout(回调函数, 0)、setImmediate(回调函数)执行顺序分析
首先结论是:这两个在 node 中的执行顺序是不确定的。
谁先执行取决于事件循环开启的时间 与 setTimeout 函数的执行时间的大小关系。在 Node 源码的 deps/uv/src/timer.c 中 141 行,有一个 uv__next_timeout 的函数决定了这两个的执行顺序。
情况一:如果事件循环开启的时间小于 setTimeout 函数的执行时间的,也就意味着先开启了 event-loop,这个时候执行到 timer 阶段,并没有 定时器的回调被放到入 timer queue 中;所以没有被执行,这个时候是先检测 setImmediate,第二次的 tick 中执行了 timer 中的 setTimeout。
即 先 setImmediate 后 setTimeout。
情况二:如果事件循环开启的时间大于 setTimeout 函数的执行时间的; 这就意味着在第一次 tick 中,已经准备好了 timer queue;所以会直接按照顺序执行即可。
即 先 setTimeout 后 setImmediate。
三、通过浏览器的 performance 面板分析事件循环机制
- Performance 是 Chrome DevTools 内置的用来分析代码执行耗时的工具,它会记录每个函数、每个宏微任务的耗时。
- 简单来说,Performance 面板是 Chrome DevTools 内置的一个功能强大、专业的性能分析工具。
- 它就像一个“应用程序的心电图仪”,可以让你深入洞察网页在运行时的所有细节,包括 JavaScript 执行、样式计算、布局、绘制、内存占用等
- 它常用来帮助你找到并修复网站的性能瓶颈,但其实用来分析事件机制简直绝妙。
示例代码
<!DOCTYPE html>
<html lang="en">
  <body>
    <script>
      function calc() {
        let a = 0;
        for (let i = 0; i < 1000000; i++) {
          a += i;
        }
      }

      function printPromise1() {
        console.log('promise1');
        calc();
      }
      function printpromise2() {
        console.log('promise2');
        calc();
      }
      function printtimer1() {
        console.log('timer1');
        calc();
      }
      function printtimer2() {
        console.log('timer2');
        calc();
      }
      function printstart() {
        console.log('start');
        calc();
      }
      function printMutation() {
        console.log('mutation');
        calc();
      }
      Promise.resolve().then(() => {
        printPromise1();
        const timer2 = setTimeout(() => {
          printtimer2();
        }, 0);
      });
      const timer1 = setTimeout(() => {
        printtimer1();

        Promise.resolve().then(() => {
          printpromise2();
        });
      }, 0);
      new MutationObserver(function () {
        printMutation();
      }).observe(document.body, {
        type: 'attribute',
        attributeFilter: ['class']
      });
      document.body.setAttribute('class', 'event-loop');

      printstart();
    </script>
  </body>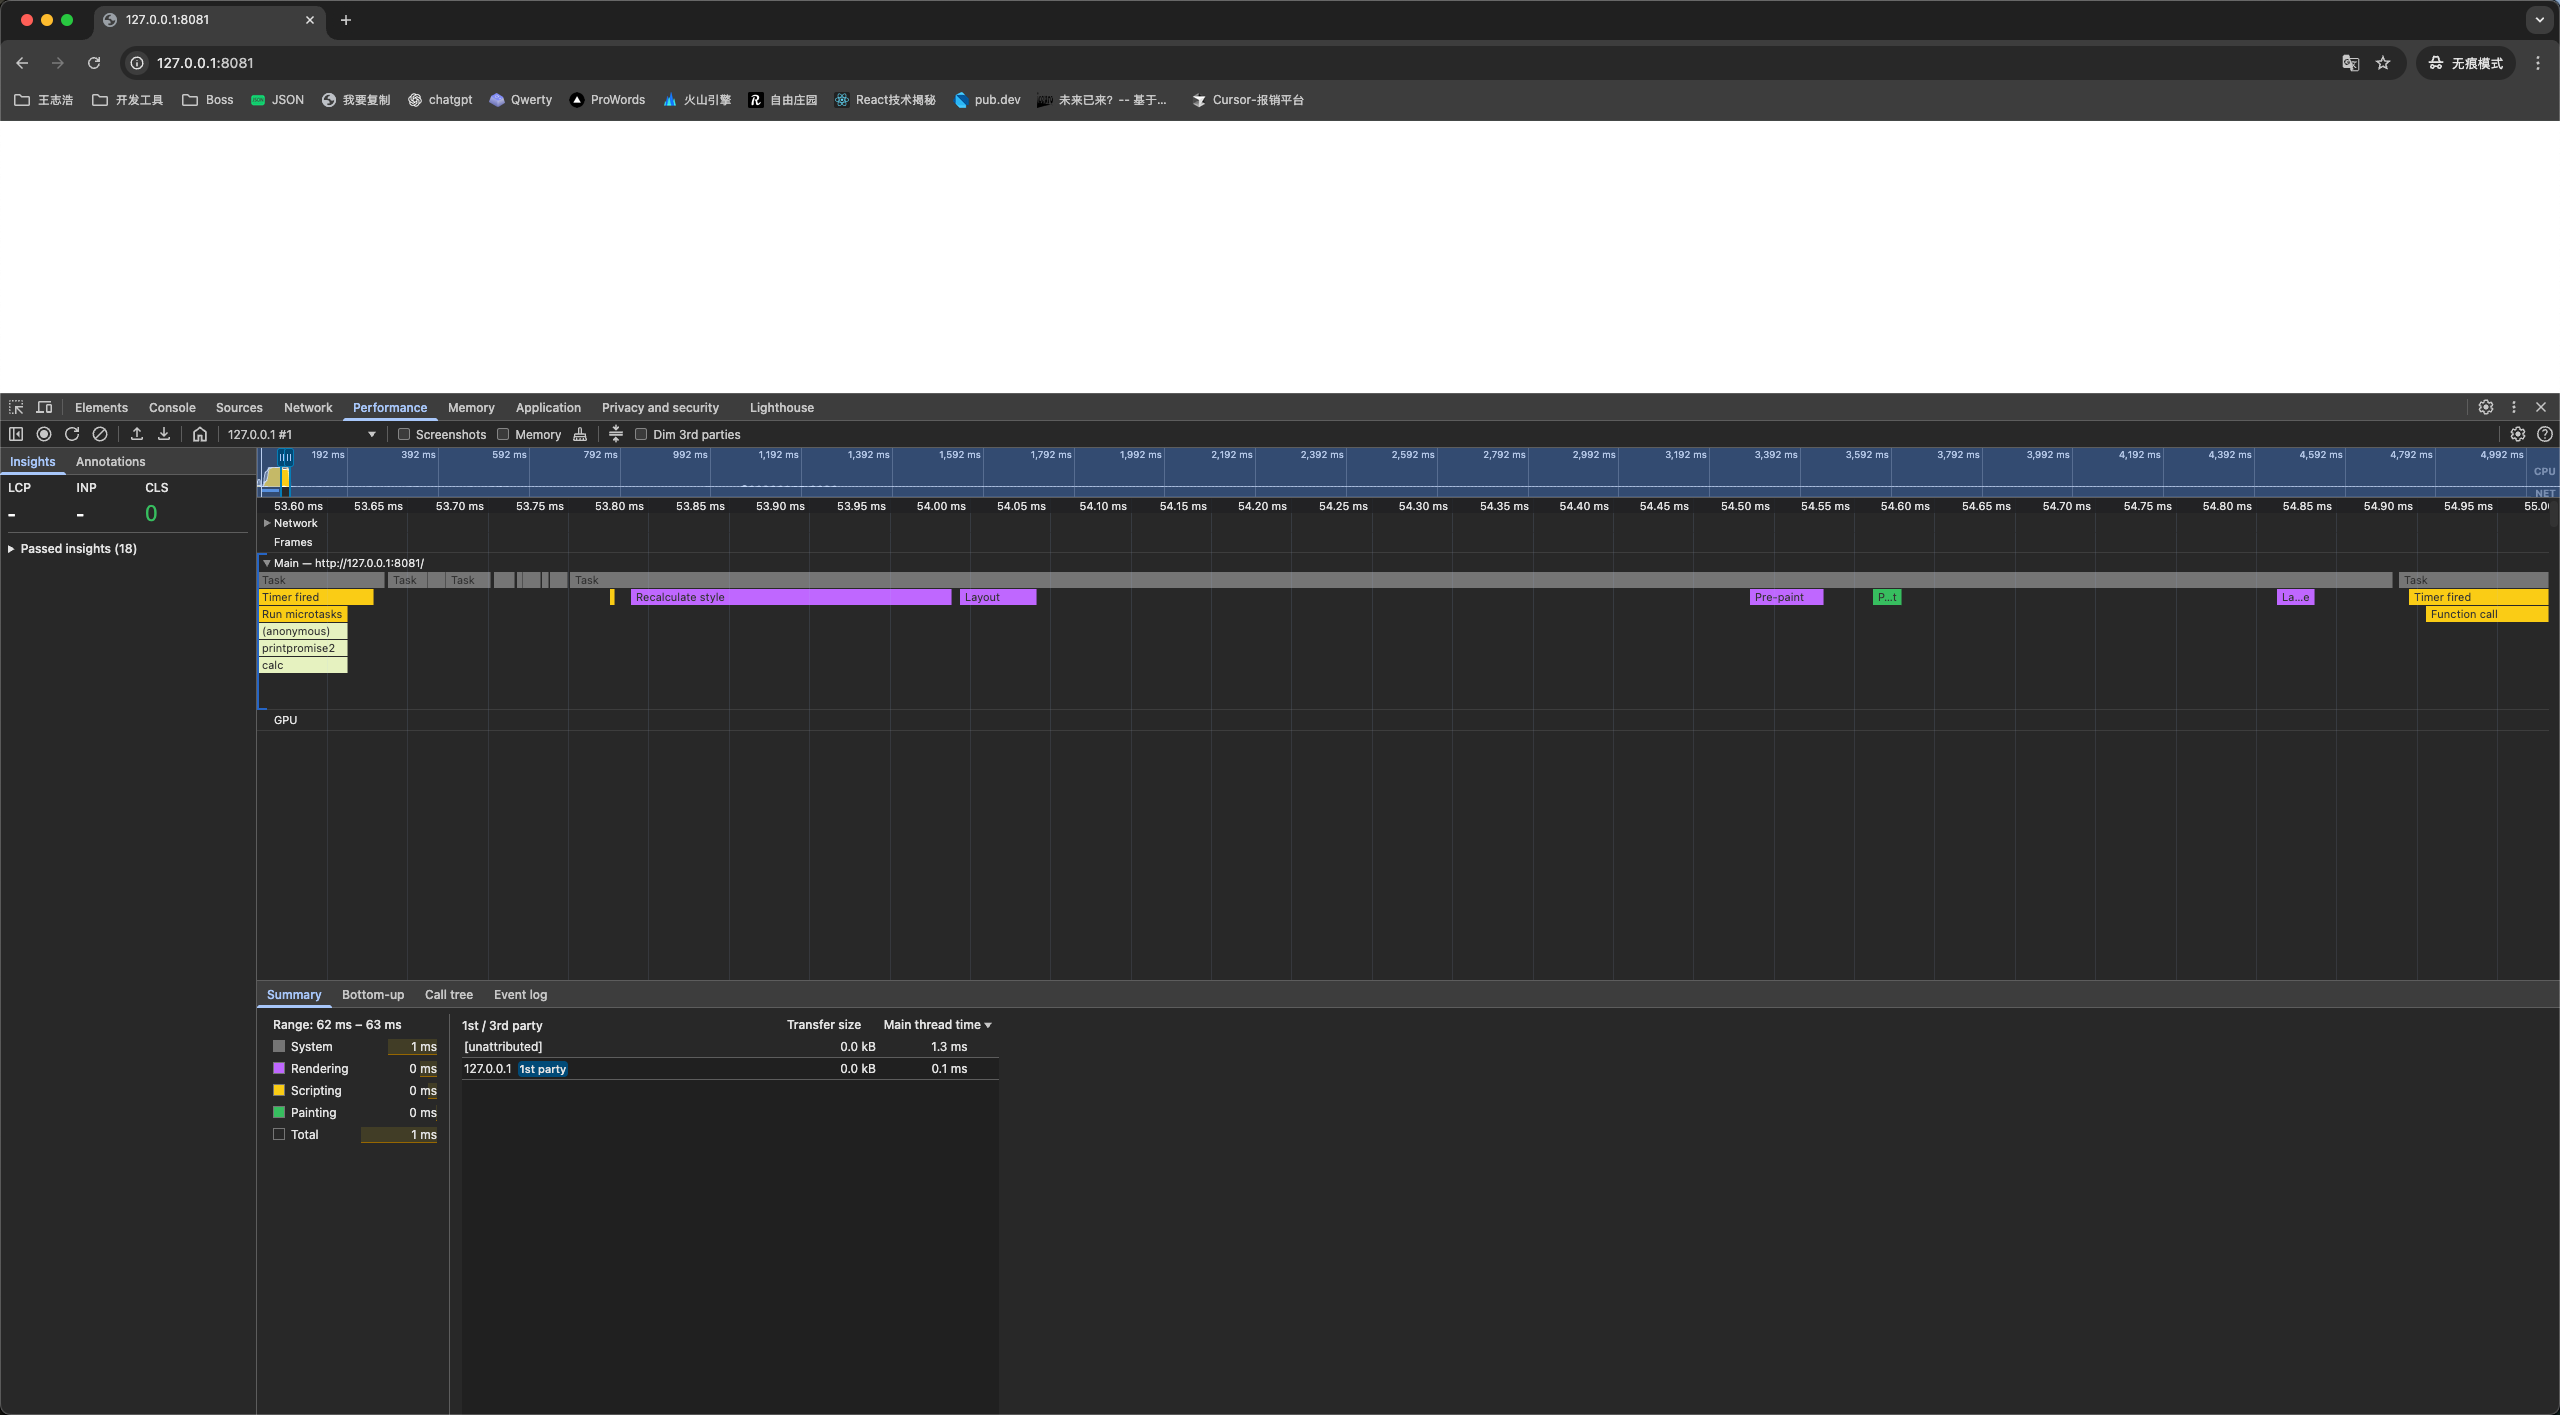
</html>performance 分析截图-总览
- 上面总览图能非常清晰的看到所有执行过程,整体是从左往右、从上往下看执行过程的。
- 一共有 script 整体代码、timer1、timer2 三个宏任务。
- 宏任务下能很清楚的看到这个宏任务的执行流程
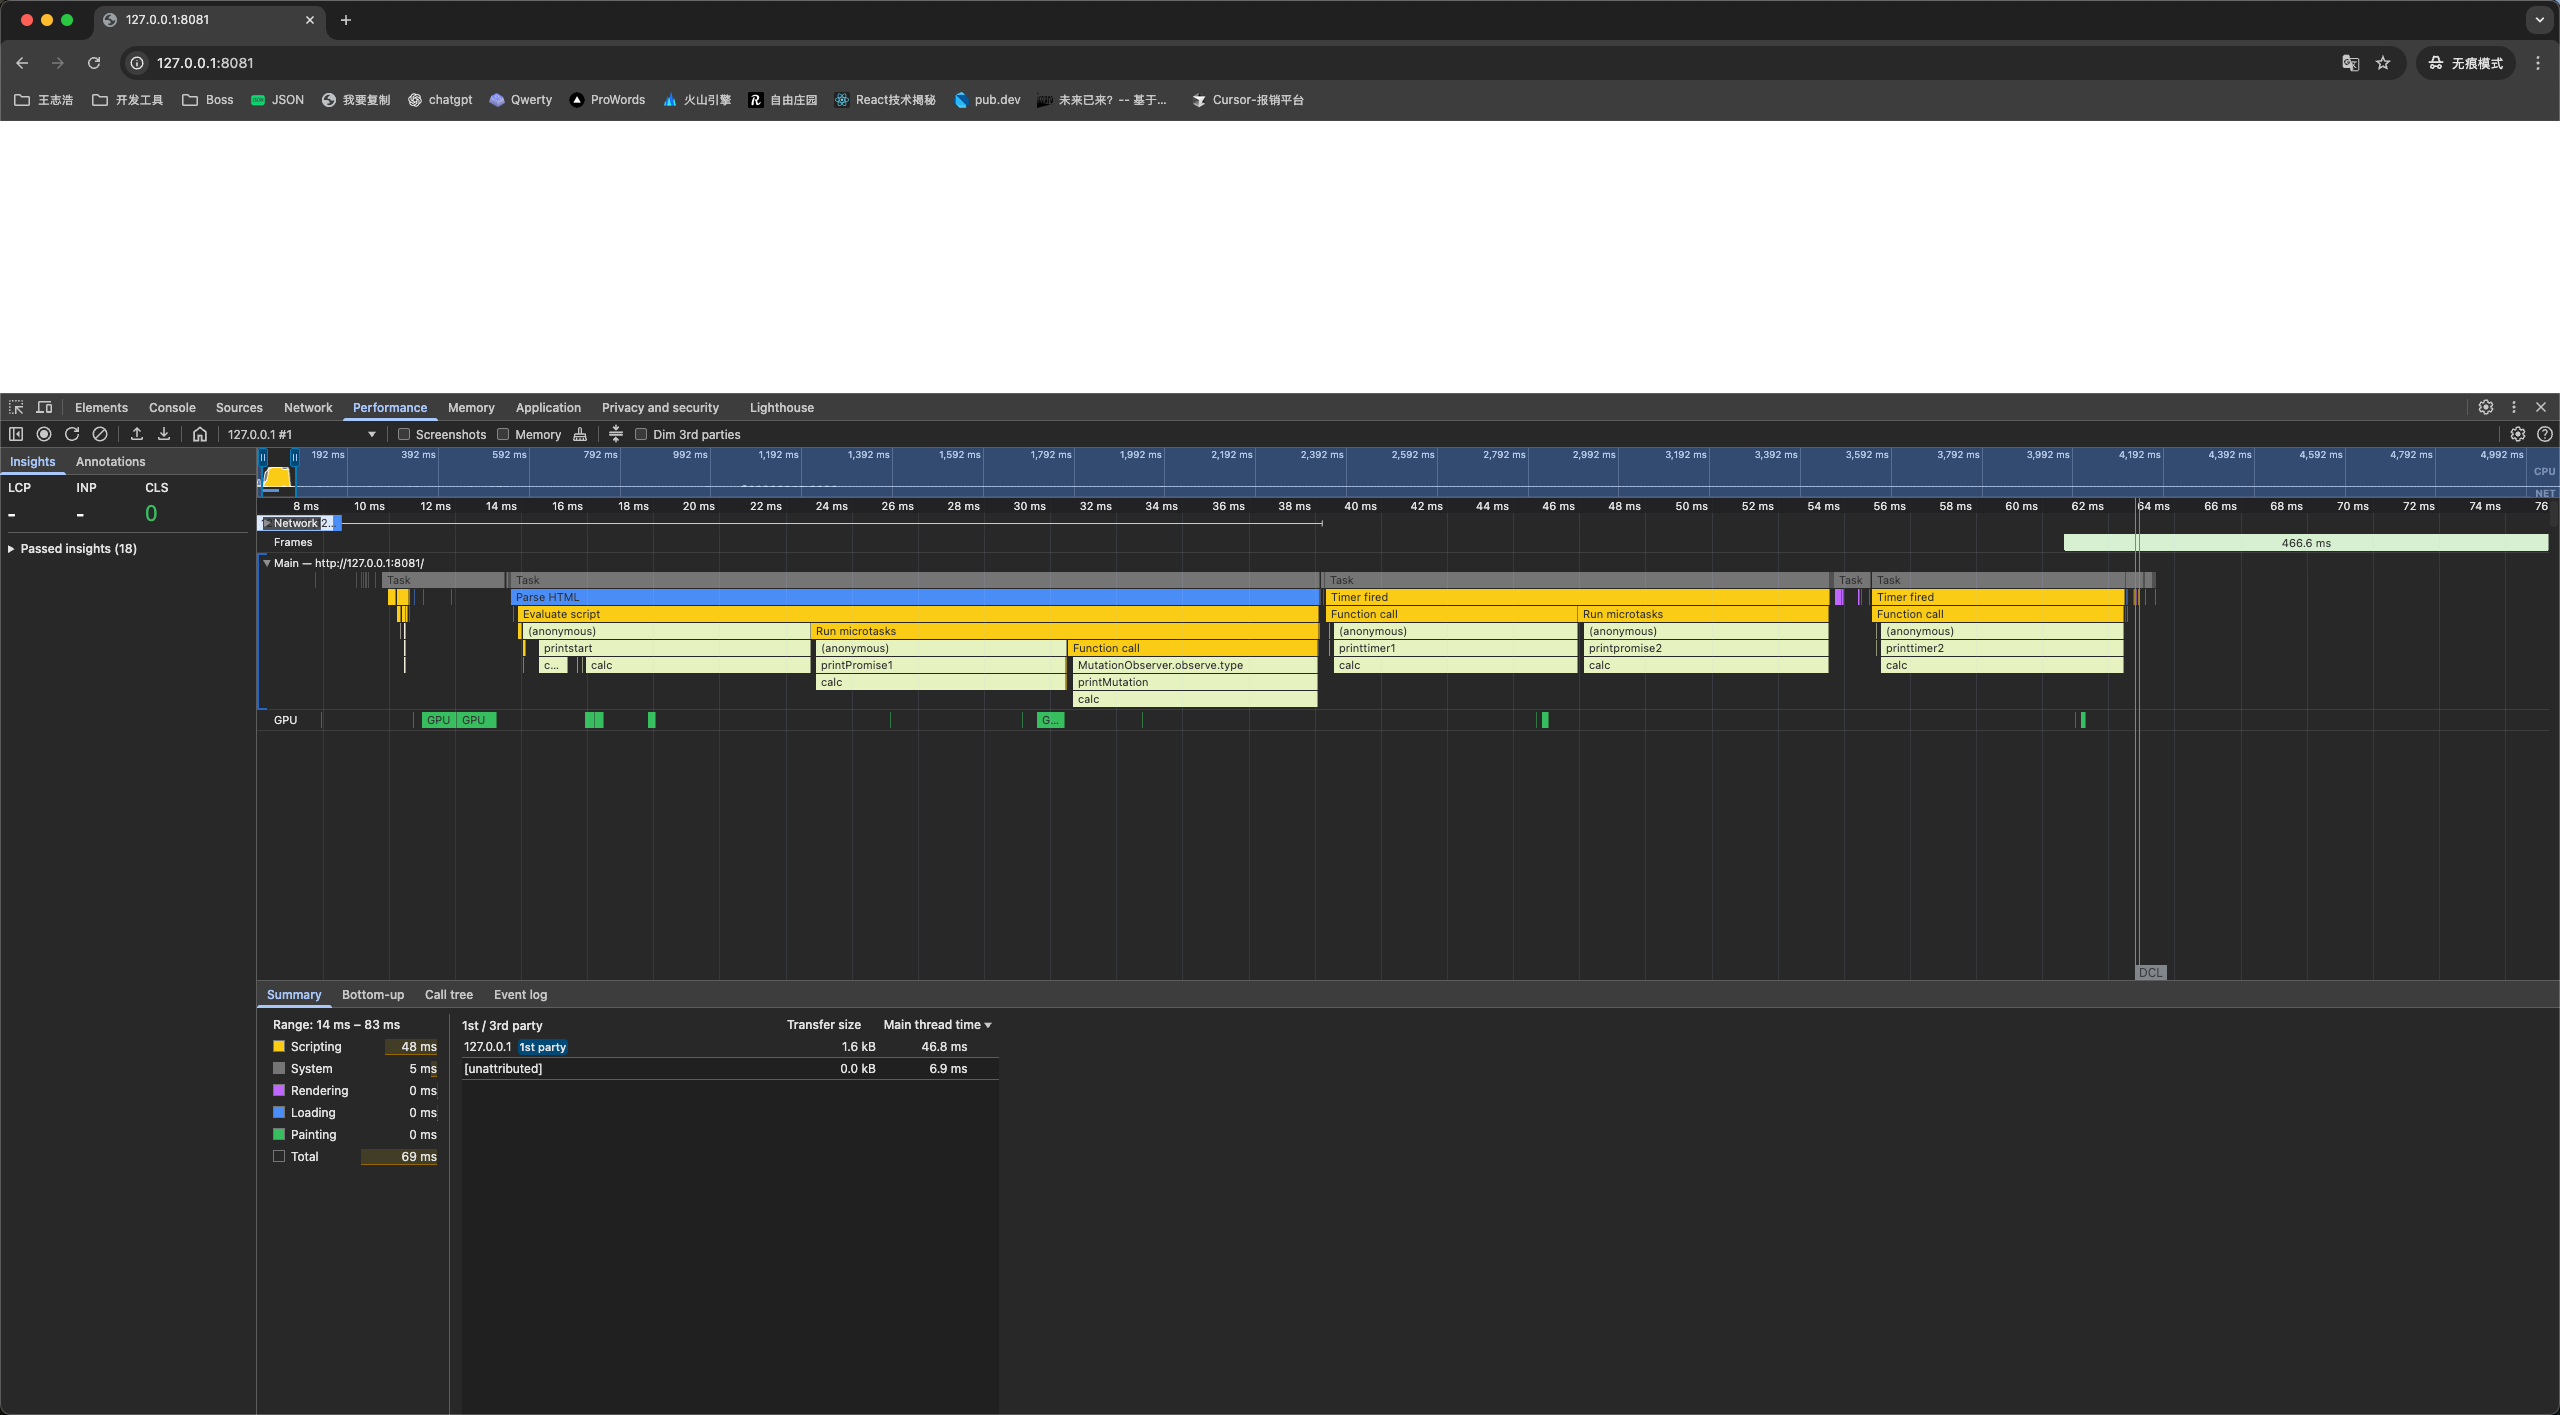
performance 分析截图-渲染时机